Use Syncthing to synchronize files between your Android phone and a Windows PC
- EN
- FR
(This post was automatically translated with www.DeepL.com/Translator)
The tutorial below is an introduction to the use of the free software Syncthing : We’re going to sync our Android phone’s photo directory with a Windows PC, so that we’ll always have a recent copy in case the phone stops working, is broken, stolen, etc.
IMPORTANT: This is a synchronization and not a simple copy. If a file is deleted on one side it also disappears on the other. To archive photos elsewhere without removing them from the phone, you will have to copy them, not move them.
What is Syncthing?
It is a synchronization software, which allows to synchronize files between 2 devices, each time these 2 devices manage to see each other (for example when they are on the same wifi at home).
(It’s particularly useful for phone backups because they take time, need a usb cable, files are spread in several folders… basically you never do them)
The principle is similar to that of Dropbox or Google Drive, with the difference that the files are not stored elsewhere than on your devices.
It is also an open source software, which means that its source code can be audited and consulted by everyone, this is a guarantee that it will never do anything problematic with your data. More information on Wikipedia: Free software.
To go further :
Syncthing can be used for many other tasks than what this tutorial proposes:
- Backup all important files from your phone to your computer (photos, etc.) every time the 2 are in proximity;
- Keep a copy of important documents on 2 computers:
- Souvenir photos ;
- Pay slips;
- Payroll;
- etc.
1. installation of Syncthing on the PC under Windows
Go to the official website of Syncthing: [https://syncthing.net/]
- Menu “Download” at the top
- Click on “Synctrayzor” (this is the Windows version of Syncthing)
- The link will send you to a page on the Github site, that of the latest version of Synctrayzor:
Download the file “SyncTrayzorSetup-x64.exe” at the bottom of the page (x86 for a very old PC).
Run the .exe - Windows will ask for several permissions: Allow all.
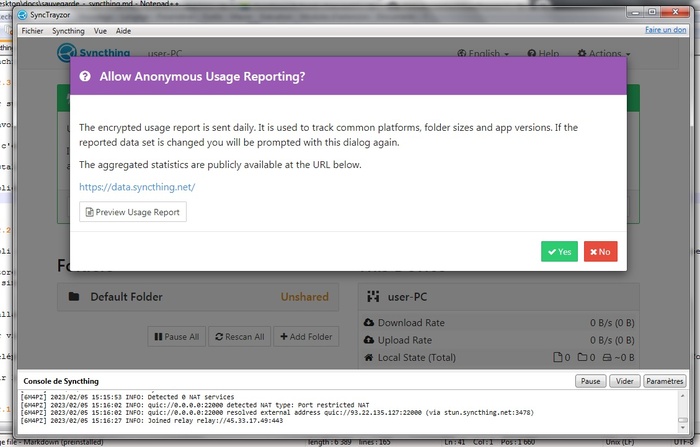
The application will launch:
Pop-up : **Allow anonymous usage reporting?
You can click on “Yes” it’s safe and it helps them to debug:
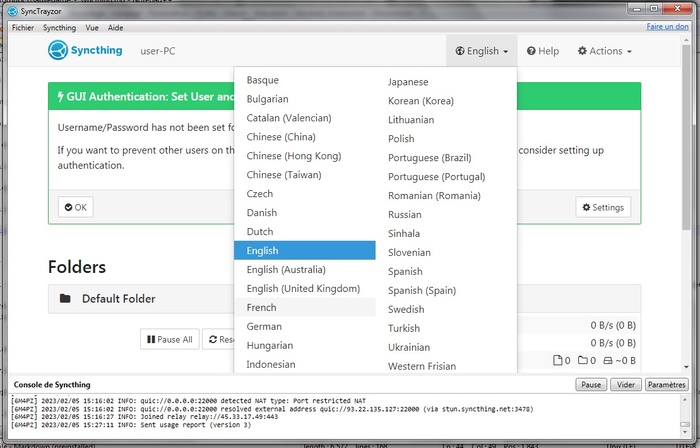
Click on “English” and choose “Français” to have the interface in French:
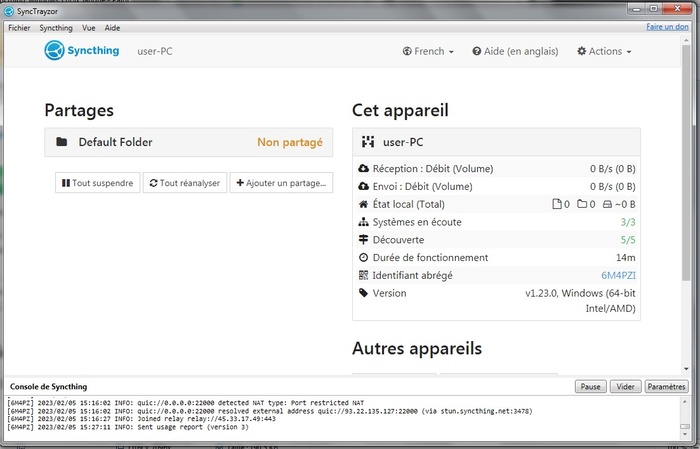
Green box asking : **Do you want to create a login/password ?
This is an advanced feature, you can put “No”.
Optional:
Go to “Action” > “Configuration” and give a nicer name to the computer (default : user-PC), example : PC_DE_JOJO"
Everything is ready, let’s go to the phone.
2. installation on an Android phone
The official application is available on the Google Play Store or on the open-source store F-Droid.
The F-Droid store guarantees that it is free software and allows to keep a little bit of privacy from Google.
But otherwise it’s the same software that is installed (personally I use F-Droid whenever I can).
2.1 Installing the F-DROID store
Go via a browser on the F-DROID website : f-droid.org/.
Choose “download F-DROID”, it will install the store on the phone:
The phone will ask the authorization to install a non secured package, do “settings” > “authorize” (the authorization is only valid for this time, it will be asked again for other installations).
2.2 Installing the Syncthing software from F-DROID
Open the F-DROID application, search for Syncthing, click on “Install”, the phone will ask for authorization again.
2.3. Configuration
Once Syncthing is installed, launch the application:
“Storage Permission” :
Click on “give permission” on everything.
Geolocation permission" :
Advanced function, no need to activate it.
Pop-up “Syncthing is disabled - do you want to change the operating conditions” :
Click on “modify” to enter the configuration.
Several configurations are possible, the most common is to tell syncthing to run only when your phone is on a wifi network, to save data:
- Run on Wifi: yes
- Run on mobile data (3G…) : no
You can also ask that the execution is only done when the phone is charging, to save battery:
- Run only when the device is powered by:"
- Mains" : allows the application to run only when charging;
- Mains and battery" : The application launches when it wants.
Special case :
If you are used to connect your computer to the internet using the “Wifi access point” mode of the phone, you can use the following configuration, it works:
- Run in Wifi : no
- Run on mobile data (3G…) : yes
Optional:
Go to the top left menu "—" > “Settings” > “Syncthing Options” and give the phone a nicer name, e.g. “TEL_DE_JOJO”
Everything is ready, you just have to introduce them to each other.
3. Authorize the 2 devices to exchange with each other
In a Syncthing synchronization, each device must authorize the other to speak to it, so that they can then propose file sharing:
- On the PC, open “Actions” > “show my ID”: A QR Code appears;
- On the phone, go to the top right, on the “+”, it opens the menu “Add a device”:
- Check “initiator” ;
- Click on “My ID” and scan the QR Code of the PC;
- click on “V” (check mark) at the top right.
- On the PC, close the QR Code window, a pop-up appears saying “New device: XXX requests to connect” -> check “Add a device”.
At this point on each side you should see the other device “connected” in the section “Other devices” (Windows) or “Devices” (Android).
2. Setting up automatic photo backup
WARNING : As mentioned above, this is a synchronization procedure and not archiving, any file deleted on one side will disappear on the other side at the next synchronization.
If you want to save your photos somewhere else, in a well-organized directory, there are 2 options:
If you want to make room on your phone, you just have to move them to another folder on your PC: they will disappear from the synchronized folder on your PC, and therefore also from your phone; If you want to keep them on the phone:** just copy them into another directory on the PC: they will remain available in the synchronized directory of the PC, and thus on the phone.
Syncthing for Android pre-configures the sharing of the main photo directory:
On the phone, you should see in the tab “Sharing” a line pre-configured under the name “Camera”, it points to the directory DCIM/Camera of the internal memory of the phone.
We will propose this sharing to the PC:
- Click on it to complete the configuration:
- “Share type”: You have 3 choices:
- “Send and receive”: Default behavior - if a file is deleted on the computer or phone it will be deleted on the other side;
- “Send only” : A file deleted on the phone disappears from the PC, but a file deleted on the PC does not disappear from the phone;
- “Receive only” : A file deleted on the phone does not disappear from the PC, but a file deleted from the PC disappears from the phone.
Personally I always choose “Send and receive” because the principles are clear:
It works like DROPBOX or GOOGLE DRIVE, each directory is a carbon copy of the other, so you don’t have to worry about what is where.And if you need to save/archive something properly, you copy or move it somewhere else.
- The connected devices are listed with a little checkbox next to them:
Check the name of the PC (“PC_DE_JOJO” in my example) - Go back with the arrow on the top left.
- “Share type”: You have 3 choices:
On the PC, a pop-up appears at the top, saying “TEL_… invites you to the “Camera” share, add this share?” :
- Click on “Add”.
- Change “root path of the share” to put the copy in the directory that suits you, example:
ocuments\fichiers_synchronises\TEL_DE_JOJO\Camera
Now that everything is in place, you will see the files of the phone appear progressively in the directory of the PC.
The 2 applications will not necessarily remain active permanently.
Think of opening the 2 at regular intervals so as to force them to update themselves.
And then? Synchronize other directories
In the phone’s “SHARES” screen, simply click on "+" at the top right to indicate another phone directory to share with the outside world.
Example:
- Choose a “Local share name” (e.g. “Facebook”) ;
- Click on “Directory” :
(The first time you do this, you may need to click on the "…" button on the top right and then “show internal memory” to see the phone’s memory)- Click on the "—" button at the top left: Normally there are 2 choices, internal memory and SD card;
- Find the directory, accept the sharing, validate.
On the PC side, the 2nd directory will produce a pop-up like the 1st one.
All that remains is to indicate the local directory in which to synchronize it (example: Documents_files_synchronized_TEL_DE_JOJO\Facebook).
The most common photo directories :
- Phone photos saved on SD card : SD card > DCIM_
- Whatsapp/Facebook/etc. pictures : Internal memory > Pictures
- Downloaded files: Internal memory > Download
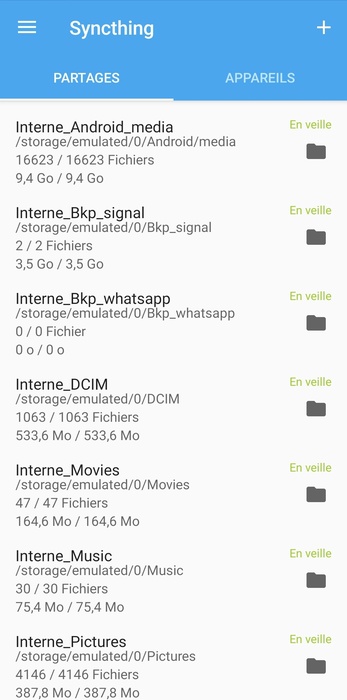
Example of a highly synchronized phone: